• Skip to primary navigation
  • Skip to main content
  • Skip to primary sidebar

Appliance. net

Appliance news, reviews, ratings, forums, reports and buyers guides.
Locate repairs and parts. for home and kitchen appliances.

  • About Appliance.Net
    • BestPrice Family
    • Contact
    • Become a Featured Dealer
    • Retailer & Repair Services Advertising
  • Shopping
  • Appliance Forum
  • Manufacturers
    • Manufacturers 800 Numbers
    • Aga
    • Bosch
    • Caldera
    • Dacor – The Life of the Kitchen
    • General Electric – GE
    • Jenn Air
    • Sears – Kenmore
    • Thermadore
  • Sections
    • Features
    • News
    • Recalls
    • Kitchen
      • Dishwasher
      • Ranges Ovens and Cooktops
      • Refrigerators and Freezers
      • Microwave Oven
    • Household
      • Consumer Electronics
      • Heating and Cooling
      • Vacuum Cleaners
    • Laundry
      • Washing Machine
      • Dryers
    • Safety
You are here: Home / Archives for _ Tips

_ Tips

As Seen on TV- One Touch Can Opener

December 18, 2007 By NightOwl

I didn’t see this on TV- but apparently it’s everywhere- the One Touch can opener. I couldn’t escape it. Bed, Bath and Beyond has been stacking them in the aisle and the check-out lines and I finally gave in. I can’t resist the idea of an easy to use can opener; mine is finicky and inconveniently mounted outside the kitchen in the laundry room, so I decided to give this new one a whirl.
Well, it is definitely easy to use. Just load it with the required AA batteries and you’re ready to go. As the package says, it is truly hands-free. We placed the opener on the can, pushed the button and watched it go. Kids really like the “magic” of it working independently.
It has only one negative that I can find, but it is a big one. The can is cut around the outer edge which removes the entire top. The top of the can is now razor sharp. If you want to drain the can by pressing the lid against the contents (as I do with tuna), it’s not possible because the lid fits back too tightly against the can. If you try to drain it and touch the top with your fingers, you risk cutting your hand. This edge is really sharp!

So far I would consider this can opener a part time help in the kitchen. I choose it for cans that will have their contents, such as tomato sauce, added directly to a pot or bowl, with no fingers nearby.

Filed Under: Cooking, Features, Household, Kitchen, Reviews, Small Appliances, _ Tips

Washing Machine Tips

December 17, 2007 By NightOwl

A new washing machine can not only be a big investment, if it’s not used properly, it can have the power to cause great damage with floods of water. We’ve gathered some helpful tips for washer usage here:

  • Water taps for the washing machine should be shut off when the washer is not in use. Most rubber fill hoses are not meant to withstand constant water pressure and can burst causing flood damage.
  • Before placing a service call, make note of when the problem occurs. Note if, for example, the washing machine is noisy on wash or spin or if the appliance has been relocated recently. Have the person most familiar with the problem place the service call.
  • Washing machines are designed to be used on solid flooring, like concrete. If installing on a wooden floor, extra joist bracing may be needed. The mounting of an additional plywood section can also strengthen an existing wooden floor. Severe internal suspension damage can occur if used on unstable flooring.
  • Washing rubber backed mats can cause problems by putting added strain on a washer and possibly causing unbalanced loads. In addition, the rubber backing can break down and separate, infiltrating the wash system clogging hoses, pumps, filters and valves. At the first sign of wear of the backing, you should discontinue washing it.
  • If you found these useful you can read more at appliance411

    Filed Under: Household, Laundry, Washing Machine, _ Tips

    Finding Your Inner Guide – or at Least a PDF Manual

    December 13, 2007 By WorkinMan

    I recently overhead someone ask a friend: ‘how did we ever find out anything before Google?’. I gave away my internet age when I said “with altavista” and added for good measure – in a gopher guide. But nevertheless, the point stands. Google is just the greatest mindshare search tool, but its just a gateway into the riches of the internet. One of the great killer aps of customer service is the ability of any manufacturer to make all of their manuals available instantly to their customers.

    att_logo.jpgMy ATT answering machine phone is acting weird, and my wife asked me to find the manual. After 10 minutes of wasting my time in paper files, I just did a quick search and came up with this page listing dozens of PDF manuals to various AT&T phones.

    One of our goals here is to create a single point resource with as many manuals as we can hunt down. So here’s a start.

    • 1150/1450 Manual – 2.4 GHz Cordless Speakerphone
    • 1160/1440 Manual – 2.4 Ghz Cordless Telephone
    • 1177 Manual – 2.4 GHz Cordless Speakerphone/Answering System with Caller Id/Call Waiting
    • 1177 Spanish Manual – 2.4 GHz Cordless Speakerphone/Answering System with Caller Id/Call Waiting
    • 1231 Spanish Manual – 2.4 GHz Dual Handset System
    • [Read more…] about Finding Your Inner Guide – or at Least a PDF Manual

    Filed Under: Consumer Electronics, Household, Manuals, News, Parts/Repairs, Small Appliances, _ Tips

    Keeping Stainless Steel Clean

    December 13, 2007 By NightOwl

    Stainless appliances are popular right now, but they are difficult to keep clean.  Fingerprints and smudges are a constant challenge. Consumer Reports tested six stainless steel cleaners, trying both wipes and sprays.

    When it comes to smudgy fingerprints, the tests showed all the cleaners do a good job removing them. But beware of claims to prevent fingerprints. None of the cleaners could do that.

    Food on stainless samples testers also put dollops of foods like peanut butter and raspberry jelly on stainless-steel samples. They also used condiments like ketchup and mustard.

    Testing, the stains sat for at least 24 hours. Then testers rinsed the samples, cleaned them following the manufacturers’ instructions, and sized up how well the cleaners removed stains.

    “Overall, all six cleaners were very effective, except when it came to mustard. They all seemed to leave some mustard stain behind on the surface.”

    For more tips and to see which product was least likely to leave streaks, read the whole story at winknews.com.

    Filed Under: Dishwasher, Kitchen, News, Ranges Ovens and Cooktops, Refrigerators and Freezers, Reviews, _ Tips

    How Microwave Ovens Work

    November 30, 2007 By NightOwl

    We use them almost daily and yet many people have no idea how a microwave oven works.  Here are the basics courtesy of the folks at HowStuffWorks.com:

    A microwave oven uses microwaves to heat food. Microwaves are radio waves. In the case of microwave ovens, the commonly used radio wave frequency is roughly 2,500 megahertz (2.5 gigahertz). Radio waves in this frequency range have an interesting property: they are absorbed by water, fats and sugars. When they are absorbed they are converted directly into atomic motion — heat. Microwaves in this frequency range have another interesting property: they are not absorbed by most plastics, glass or ceramics. Metal reflects microwaves, which is why metal pans do not work well in a microwave oven.
    You often hear that microwave ovens cook food “From the inside out.” What does that mean? Here’s an explanation to help make sense of microwave cooking.
    Let’s say you want to bake a cake in a conventional oven. Normally you would bake a cake at 350 degrees F or so, but let’s say you accidentally set the oven at 600 degrees instead of 350. What is going to happen is that the outside of the cake will burn before the inside even gets warm. In a conventional oven, the heat has to migrate (by conduction) from the outside of the food toward the middle (See How a Thermos Works for a good explanation of conduction and other heat transfer processes). You also have dry, hot air on the outside of the food evaporating moisture. So the outside can be crispy and brown (for example, bread forms a crust) while the inside is moist.

    In microwave cooking, the radio waves penetrate the food and excite water and fat molecules pretty much evenly throughout the food. No heat has to migrate toward the interior by conduction. There is heat everywhere all at once because the molecules are all excited together. There are limits, of course. Radio waves penetrate unevenly in thick pieces of food (they don’t make it all the way to the middle), and there are also “hot spots” caused by wave interference, but you get the idea. The whole heating process is different because you are “exciting atoms” rather than “conducting heat.” 

    In a microwave oven, the air in the oven is at room temperature, so there is no way to form a crust. That is why microwavable pastries sometimes come with a little sleeve made out of foil and cardboard. You put the food in the sleeve and then microwave it. The sleeve reacts to microwave energy by becoming very hot. This exterior heat lets the crust become crispy as it would in a conventional oven.

    Filed Under: Kitchen, Microwave Oven, _ Tips

    Brewing the Perfect Cup of Coffee

    November 29, 2007 By NightOwl

    If you want know how to do something right, ask an expert.  The experts at Krups, the manufacturers of both commercial and home coffeemakers, offer these tips for great brewing:

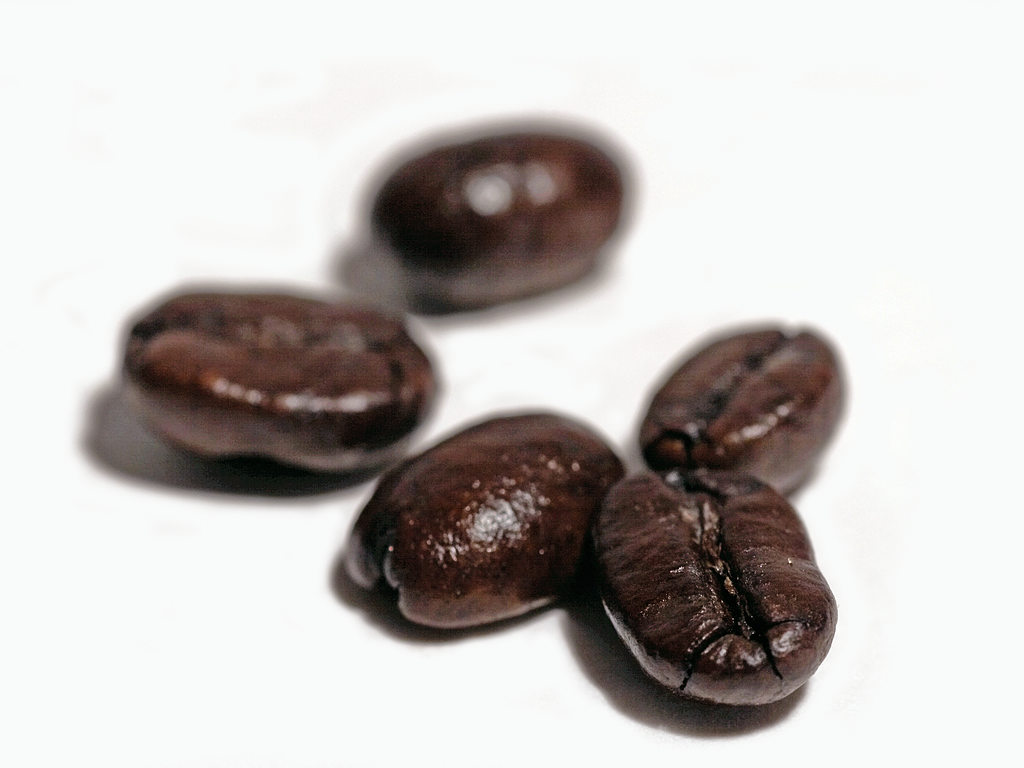
    1. The Coffee Beans Whole beans stay fresh longer
     It is best to buy as soon after roasting as possible. Ideally, you should purchase your coffee fresh every 1 – 2 weeks; and buy only the quantity that you need to last for that period of time.

    2. The Grind
     Always grind your beans as close to the brew time as possible.

    Do not underestimate the importance of the grind to the taste of your coffee. They type of grind used in a particular machine can alter the taste and flavor of coffee. The general “rule of thumb” is the longer the extraction period (the time water spends in contact with the grounds) the coarser the grind should be. Generally coffee is finely ground for espresso and coarsely ground for a French press machine. Drip coffee machines fall somewhere in the middle. Experiment with the grind and your favorite coffee to get the perfect result. If you have your coffee ground in the store, specify the grind or let them know what type of machine you are using so they can grind accordingly.

    3. The Water
     The water you use is VERY important to the quality of your coffee. Its best to use filtered or bottled water. If you are using tap water let it run a few seconds before filling your coffee pot. Be sure to use cold water. Do not used distilled or softened water. Some Krups coffee machines use a unique filtration system that removes traces of chlorine for a better taste and reduces mineral deposits for longer machine life. The ratio of coffee to water is also very important. Use the proper amount of coffee, which is typically 1 to 2 tablespoons of ground coffee for every six ounces of water. This can be adjusted to suit individual taste preferences. Be sure to check the “cup” lines on your brewer to see how they actually measure.

    4. Water Temperature During Brewing
     Your coffee machine should obtain a water temperature between 195 – 205 degrees Fahrenheit when brewing. Water temperatures below this temperature will result in flat, weak coffee while water that is too hot will scald the grounds and result in poor tasting coffee.

    5. Brewing Time
     The amount of time that the water is in contact with the coffee grounds is another important factor affecting the taste of your coffee. If the taste of your coffee is not optimal, it is possible that it is either over-extracting (the brew time is too short). the type of filter used – gold tone, paper, flat or cone – also effects the contact time. Experiment with the contact time until you can make a cup of coffee that suits your tastes perfectly.

    Krups’ Deep Brew Technology, a feature of most Krups coffee machines, eliminates any room for error because it heats water to an ideal temperature, then pulses it through the coffee grounds at precisely timed intervals, resulting in rich, fully flavored coffee.

    6. After Coffee Has Been Brewed
     Brewed coffee should be enjoyed immediately. It is recommended to use a pre-heated mug or coffee cup to maintain optimal temperature. If the coffee is not served immediately, it is recommended to pour the coffee into an insulated thermos and serve within 45 minutes. Remember: never reheat your coffee. Thermal coffee machines, such as the Krups Aroma Control Therm, are an ideal way to brew and store coffee while maintaining freshness because it does not require a warming plate which makes coffee bitter over time.

    7. Enjoy Your Coffee!
     Take a moment to smell the aroma and taste the flavor. A thoughtfully prepared cup of coffee will make for a much more enjoyable coffee experience.

    Filed Under: Cooking, Kitchen, Small Appliances, _ Tips

    Don’t Clean Your Oven Today!

    November 21, 2007 By NightOwl

    Here’s a very good tip from Appliance411:
    as, garberator, microwave, oven, range, stove, refrigerator, automatic and clothes washers or washing machines

    Helpful and money saving tips from APPLIANCE411! Oven Cleaning
    Clean your oven *well* in advance of a dinner party! It is not usually a good idea to try self-cleaning an oven *immediately* prior to a big dinner. Cleaning a week or more in advance would allow service to be scheduled should a problem arise. They often do… and at the of worst times.

    Filed Under: Cooking, Kitchen, Oven, _ Tips

    HE Washers Need HE Detergent

    November 20, 2007 By NightOwl

    When I got my new frontloading, high efficiency(HE) washer, I was told I could use a smaller amount of regular detergent or buy the more expensive high efficiency(HE) detergent.  It was up to me, there would be little difference other than a bit more sudsing with the regular soap.  I decided to start with the HE detergent and discovered that it sudses up too. In fact, I had to cut back to half the amount of HE detergent per load or the washer stopped, flashing an error code.  Now, by using half, the cost was equal too.

    It seems that the sudsing is an issue for many people, some feel you need it, others don’t care, but the real concern should be- are the clothes clean?  I’ve been looking around and found that fixitnow.com has some great (although sometimes quirky) answers to the HE vs regular detergent question.

    You have to start with the understanding that the tumble action of high-efficiency washers (i.e., front loaders) produce more suds than the agitator action in top loaders. Now most of people think, “Oooo, sudsy, that’s good!” No, not good. Suds do nothing to clean your clothes and are actually an undesirable by-product of the detergent’s chemical interaction with the water.
    The main job of detergents is to remove soils and stains. They do this by breaking down the surface tension of water, in effect, making water “wetter.” The water is what actually does the cleaning by slipping in between the [dirt] and the fabric, separating them and suspending the [dirt] in solution.

    Detergents are designed to freshen, remove odors, and brighten fabrics as they clean. Another key detergent function is to hold [dirt], and any dyes from colored fabrics, suspended in the wash water so they aren’t re-deposited back onto the cleaned clothes. Traditional detergents are designed to do this in high water volumes used by conventional, top-loading water hog washers.
    If you think about it, using HE detergent in your front loader is really common sense. Because of the low-water wash and rinse cycles in HE washers, HE detergents must work differently from traditional laundry detergents in order to be effective. So, a bunch of them pointy-headed scientist types with all kinds of fancy degrees hung on their walls got together to design detergents that would be low-sudsing and quick-dispersing to get the best cleaning performance in front-loading washers.
    Excessive sudsing can cause problems in HE washers by “cushioning” — or even preventing — the tumbling action. HE detergents also hold soils and dyes in suspension in low water volumes, so they don’t re-deposit onto cleaned clothes.
    Excess suds can cause the washer’s pump to overheat causing premature failure of the pump. These excess suds also cause residue to build up inside the drum and hoses. After a while, your washer will start giving off a moldy funk and infecting your clothes with its faint, musky stink.
    Low wash temperatures and/or use of regular detergent (which causes excess suds) may prevent some [dirt] from completely rinsing out of the front-loading washing machines. Oily soils and some dirt-type soils are especially sensitive to lower wash temperatures and medium to high suds levels. Over time, [dirt] will accumulate in the washer and lead to the growth of bacteria and mold, which we professional appliantologists refer to as bio-gookus. This bio-gookus will start stinking and may even impart odors to your clothes. To avoid all this unpleasantness, you should periodically run a maintenance cycle on your front-loader.

    The Fix it now folks suggest the following to run a maintenance cycle:

    1. Select the hot water setting. If there is no hot water setting, then select a “white” or a “stain” cycle setting. (Note: do not put laundry in the washer.)

    2. Select the “extra rinse” option, if offered.

    3. Add liquid chlorine bleach to the bleach dispenser. Fill to its maximum level.

    4. Run the cycle through its completion.

    5. If the washer does not have a second rinse option, manually select an additional rinse cycle to ensure that no chlorine bleach remains in your washer.

    6. If your washer still has a funk, repeat steps 1 through 5 as necessary.

    BTW, this is good to do periodically on top-loaders, too.

    I switched to HE detergent from the start with my front loader, and after reading this, I’m glad I did. These washers are an expensive investment, and I want mine to last a long time.

    Filed Under: Washing Machine, _ Tips

    Cook Safely This Holiday Season

    November 19, 2007 By NightOwl

    With the joy of the holidays comes the joy of delicious food- and someone has to cook it.  If that someone is you, you might want to take a look at the Association of Home Appliances Manufacturers (AHAM)safety page.  There, you can order brochures, read safety tips and learn facts like these:

    • The range-top was involved in nearly 8 of every 10 cooking fires.
    • In nearly 3/4 of the fires reported (73%), the person responsible for the fire was not in the area when the fire started.
    • The other major causes of cooking fires reported were grease, food left on the range, and combustible materials on the range-top.
    • In nearly 2/3 of the fires (64%), people in the residence did not attempt to fight the fire but left the area.
    • Unfortunately, one-half of the people who did try to fight the fire, did it incorrectly, further endangering themselves and their families.
    • A larger percentage of the cooking fires were caused by people in the age range of 19 – 69 than is represented by their percentage of the overall population.
    • One-half of the cooking fires reported were caused by people between the age of 30 – 49.

    The age range of 19-69 and 30-49 being overrepresented makes sense to me since that is the age of most family members who are the cooks in the family. So, if you are the family chef, cook carefully and have a delicious holiday.

    Filed Under: Cooking, Gas Range, Kitchen, News, Ranges Ovens and Cooktops, _ Tips

    Induction Cooking is Hot- and Cool

    November 16, 2007 By NightOwl

    Induction cooking has been around for a while, but it seems that in North America it is just beginning to assert itself.  I’ve recently learned more about how the technology works from some helpful sites. 

    At choice.com.au they offer a clear explanation about the magnetic fields:

    Each ‘element’ (an induction coil) generates a magnetic field that induces heat in steel cookware placed on top of it. In essence, the pot becomes the element that cooks the food, so the cooktop surface doesn’t get as hot as other cooktops. Induction cooktops have the same instant control as gas and are the fastest of all cooktop types to heat and cook food — for example, they take about half the time of conventional electric cooktops to boil water.

    They go on to explain that induction cooktops are smooth surfaces that are extremely easy to keep clean.

    Because the heat is contained by the vessel, the cooking surface doesn’t get hot.  This picture shows that induction cooking is hot and cool.

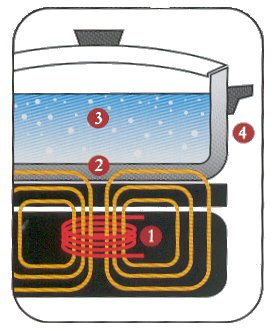
    Another site, theinductionsite.com, has very thorough explanations of induction cooking and even includes some simple drawings like this one below with clearly labeled descriptions.

    diagram of induction process

    How Induction Cooking Works:

    1. The element’s electronics power a coil that produces a high-frequency electromagnetic field.
    2. The field penetrates the metal of the ferrous (magnetic-material) cooking vessel and sets up a circulating electric current, which generates heat.
    3. The heat generated in the cooking vessel is transferred to the vessel’s contents.
    4. Nothing outside the vessel is affected by the field–as soon as the vessel is removed from the element, or the element turned off, heat generation stops.

    (Image courtesy of Induction Cooking World)
    As mentioned in point two in the diagram, pots and pans must be made of a ferrous, or magnetic metal.  One way to check if your current pans are ferrous is to see if a magnet will stick to them.  If your pans do not have a ferrous metal base, you will need to consider the cost of some new cookware along with the generally steep cost of these cooktops. (I found them online for $1,800-$5,000.) There are some induction ranges in the works that can use other metals, but they’re not available yet.

    I had concerns about the magnetic fields generated by the coil, and discovered that they are not completely unfounded. People with pacemakers should take precautions near the range and might want to check with their doctors before getting one. Theinductionsite has a whole page dedicated to the controversy surrounding radiation from electromagnetic waves.

    There seem to be plenty of both pros and cons to induction cooking- lower energy use saves money, but the cooktop is expensive and may require new cookware.  Food cooks more quickly, but new techniques must be learned.  The safety of the burner going off automatically if there is no pot on it, but the pots slide easily and could get unintentionally bumped so the food won’t cook.  If you are shopping for a new range there is a lot to consider about induction cooking and the choice will be a personal one.

    Filed Under: Cooking, Kitchen, News, Ranges Ovens and Cooktops, Reviews, _ Tips

    • « Go to Previous Page
    • Go to page 1
    • Interim pages omitted …
    • Go to page 8
    • Go to page 9
    • Go to page 10
    • Go to page 11
    • Go to page 12
    • Go to Next Page »

    Primary Sidebar

    [footer_backtotop]

    © 2006-2019 Appliance.net · Log in