• Skip to primary navigation
  • Skip to main content
  • Skip to primary sidebar

Appliance. net

Appliance news, reviews, ratings, forums, reports and buyers guides.
Locate repairs and parts. for home and kitchen appliances.

  • About Appliance.Net
    • BestPrice Family
    • Contact
    • Become a Featured Dealer
    • Retailer & Repair Services Advertising
  • Shopping
  • Appliance Forum
  • Manufacturers
    • Manufacturers 800 Numbers
    • Aga
    • Bosch
    • Caldera
    • Dacor – The Life of the Kitchen
    • General Electric – GE
    • Jenn Air
    • Sears – Kenmore
    • Thermadore
  • Sections
    • Features
    • News
    • Recalls
    • Kitchen
      • Dishwasher
      • Ranges Ovens and Cooktops
      • Refrigerators and Freezers
      • Microwave Oven
    • Household
      • Consumer Electronics
      • Heating and Cooling
      • Vacuum Cleaners
    • Laundry
      • Washing Machine
      • Dryers
    • Safety
You are here: Home / Archives for _ Tips

_ Tips

Can KitchenAid Stand up to the Grind?

July 23, 2007 By NightOwl

One of the easiest ways I have found to get calcium and vitamins into my kids is to offer them smoothies as an after school snack.I just throw a variety of frozen fruit, yogurt and some milk into the blender and produce a treat they love. This is a great time of year to pull out the blender and make a cool treat.

I have been doing this for years using a Hamilton Beach blender I purchased on sale at a local drugstore almost twenty years ago. Now we have a problem. kitchenaid-blender.gif
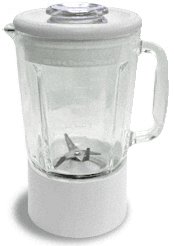
About five years ago, my husband bought me a Kitchenaid blender that claims to be strong enough to crush ice at all speeds, but after years of occasional use, the coupler started breaking apart.The coupler is that small black gear-like circle that connects the blender jar and blades to the base. It has broken in two stages. The first time, when two pieces broke off, I called Kitchenaid customer service. The representative there was friendly and sympathetic, but as our blender was out of warranty, she offered no advice other than that we could continue to use the blender as it was although, it would add a slight strain to the motor and therefore shorten the lifespan of the appliance somewhat.

kitchenaid-blender-drive-coupling.gif

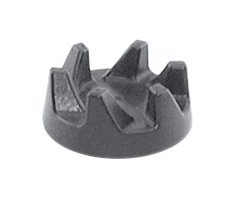
So, we continued using the blender for the next few months.Yesterday, two more pieces of coupler broke off.I have sent the base to be repaired at an authorized repair shop at a cost of $25. This is not a huge cost, but as a percentage of an $80 blender, it seems high considering how often (or not, really) we used it. I just think a blender that claims to be an ice crushing, high powered appliance, made by a quality manufacturer should be more durable.

Filed Under: Consumer Electronics, Cooking, Household, Kitchen, News, Parts/Repairs, Reviews, _ Tips

Finding Your Inner Guide – or at Least a PDF Manual

July 12, 2007 By WorkinMan

I recently overhead someone ask a friend: ‘how did we ever find out anything before Google?’. I gave away my internet age when I said “with altavista” and added for good measure – in a gopher guide. But nevertheless, the point stands. Google is just the greatest mindshare search tool, but its just a gateway into the riches of the internet. One of the great killer aps of customer service is the ability of any manufacturer to make all of their manuals available instantly to their customers.

att_logo.jpgMy ATT answering machine phone is acting weird, and my wife asked me to find the manual. After 10 minutes of wasting my time in paper files, I just did a quick search and came up with this page listing dozens of PDF manuals to various AT&T phones.

One of our goals here is to create a single point resource with as many manuals as we can hunt down. So here’s a start.

  • 1150/1450 Manual – 2.4 GHz Cordless Speakerphone
  • 1160/1440 Manual – 2.4 Ghz Cordless Telephone
  • 1177 Manual – 2.4 GHz Cordless Speakerphone/Answering System with Caller Id/Call Waiting
  • 1177 Spanish Manual – 2.4 GHz Cordless Speakerphone/Answering System with Caller Id/Call Waiting
  • 1231 Spanish Manual – 2.4 GHz Dual Handset System
  • [Read more…] about Finding Your Inner Guide – or at Least a PDF Manual

Filed Under: Consumer Electronics, Household, Manuals, News, Parts/Repairs, Small Appliances, _ Tips

Fresh home made ice cream for the Fourth of July

June 29, 2007 By NightOwl

One of my fondest childhood memories is of eating homemade chocolate ice cream on the Fourth of July. statue of liberty Fourth of July FireworksI can still hear in my mind the sound of my parents’ ice cream maker churning for hours in the bathtub. (Where it was placed to catch the water from all the condensation that would form.) I also remember the great fun we kids would have smashing blocks of ice into the crushed ice needed to fill the bucket around the ice cream canister. My mother would fill milk cartons with water and freeze them a few weeks before the holiday in preparation for the big day.

make-healthy-rich-home-made-ice-cream-for-your-kidsNow that I’m a mother, I not only make ice cream on the Fourth of July, but on any day I want to give my family a special treat. Old fashioned ice cream makers like my parents’ are still out there, (you can even find ones that require hand churning) but I have one of the gel-canister types that is much less messy. Some advance planning is still necessary, as the canister must be frozen for at least twenty four hours before use, but if you store it in the freezer, you are always ready for spontaneous ice cream making.

Here are a few tips for making your own ice cream:

  • The gel-canister should be completely dry before being frozen overnight.
  • If you plan to store it in the freezer, place the canister in a bag to keep it free of crumbs and ice that might fall on it.
  • Ice cream bases must be thoroughly chilled before processing.
  • Processing times vary, start checking at around twenty minutes.
  • Add nuts, etc. thorough the lid opening during the last few minutes of processing.
  • Let the canister thaw completely before washing.
  • Be gentle with the canister; some can be easily punctured by a sharp tool.

Chocolate ice creams are still my favorite, but vanilla is a big hit in this house as well. I have also found that a good vanilla base is a great start for fruit ice creams. Here are some basic recipes and variations from the manual that came with my Hamilton Beach ice cream maker, that I have used and enjoyed.

Old Fashioned Vanilla Ice Cream

¾ C sugar
dash of salt
1 ¾ c whole milk
2 eggs, beaten
1 ½ C heavy whipping cream
1 tsp vanilla

Combine the first three ingredients in a heavy saucepan, and cook over medium heat stirring until mixture is steaming. Reduce heat to low.

In a medium bowl whisk eggs and slowly whisk in half the hot mixture and then pour all back into the saucepan. Cook until slightly thick, about three minutes. Remove from heat and chill.
When ready to freeze, stir in heavy cream and vanilla. Follow directions for freezing in your ice cream maker.

Because that recipe requires advance preparations, and I tend to do my cooking on the spur of the moment, I use the next recipe most often. I also try to cut back on fat and calories where I can and I have found that I can turn this recipe into low fat ice cream (or ice milk) by substituting half and half for the cream and 2% milk for the whole milk. It is definitely a less creamy, icier dessert, but then I don’t have to feel so guilty eating it.

Easy Vanilla Ice Cream

1 C sugar
2 tsp lemon juice
2 C whipping cream
1 C milk
1 tsp vanilla

Combine all ingredients, mix well and freeze according to manufacturers directions.

home-made-vanilla-ice-cream

Some variations we enjoy:

Cookies and Cream– reduce the sugar to ½ cup and add about 15 broken chocolate sandwich cookies after about 15 minutes of churning.

Mint Chip – Substitute mint extract for the vanilla and add 1 cup mini chocolate chips after about 15 minutes of churning.

There are ice cream makers by Cuisinart, Delonghi, Salton and Rival. You can spend a simple thirty dollars on up to close to three hundred. Kitchenaid even makes an attachment that turns its mixer into an ice cream maker. My simple Hamilton Beach model has worked well for my family; it makes one quart, which serves everyone, (There are six of us.) but rarely leaves leftovers. I sometimes wish I could make a larger quantity, but for the most part this works, and part of the fun is making and eating a new batch.

Filed Under: Cooking, Kitchen, News, Recipes, Refrigerators and Freezers, Small Appliances, _ Tips

Urban Legends – the truth will out

May 17, 2007 By NightOwl

I feel sorry for our parents.  They never knew the whether old urban legends were true or false.  We have Snopes – the original, ultimate rumor checker.   The next time somebody sends you an email insisting that you have to “pass it on to everybody you know”  go to snopes first and check it out.

 Here are a few great tidbits related to appliances.

True or False:  You can make water explode in a microwave.

 http://www.snopes.com/science/microwave.asp  Believe it or not, its true.

Here’s an oldie but goodie:  Does plastic leach toxins into your food when microwaved?  Check it out here:

http://www.snopes.com/medical/toxins/cookplastic.asp 

Filed Under: Kitchen, Microwave Oven, _ Tips

Dangerous Ovens and Stoves That Tip Over

May 17, 2007 By NightOwl

stove tippingThose of us in earthquake and seismic-savvy Southern California realize that this is a serious concern, of which, I believe, most people are completely unaware. Of greater concern is the risk to  families with children young enough to use simple leverage.   A climbing toddler could easily become a crushed toddler.  My advice would be to bolt the oven to the wall right away, and remember to always keep an eye on kids in the kitchen – there is no substitute for adult supervision.

KHOU has a video and full article.

Greek philosopher Archimedes quipped: “Give me a place to stand on, and I can move the earth.”

Toppling a kitchen appliance is clearly demonstrated by KHOU to be a piece of cake.

On the subject of child safety in the kitchen, here’s a horrible reminder of the dangers of even the most common household appliances when kids are on the loose. http://www.snopes.com/horrors/parental/dishwasher.asp 

archimedes lever

Filed Under: Dishwasher, Kitchen, Oven, _ Tips

How to ruin your electric wall oven for under a buck

March 7, 2007 By WorkinMan

No matter how high tech our ovens, ranges and other appliances get, we’re sometimes still driven to try old fashioned fixes. I’m sure that you hate when your food overflows and spills on the bottom of the oven. You know its just gonna burn off and smoke up the joint before its gone. So you quickly try mom’s old trick of lining the bottom of the oven with foil. Maybe not such a great idea with today’s high powered, but delicately balanced ovens. I found this piece in a Missouri paper called the News Leader.

You want to keep your oven sparkling clean so you protect it by putting aluminum foil on racks, under food as it cooks, and down on the oven floor where food drops and burns to a crisp. But instead of helping, you’re hurting your oven.
Foil placed on the oven floor reflects and intensifies heat, which can cause the bake element to burn out prematurely.

Foil placed under foods on the racks is bad because it traps heat in the bottom of the oven, keeping it from circulating and reaching the heat sensor near the top. Severe overheating is possible; besides damaging the bake element, that could also affect insulation in the oven wall and discolor or even crack oven-door glass.

By disrupting temperatures and air circulation, aluminum foil messes up cooking times, too.

A quickie clean just isn’t worth it.

Filed Under: Kitchen, News, Oven, _ Tips

Kitchen Improvements Pay

September 15, 2006 By Appliance

From a UK website called NewsShopper. I’ve substituted American English for British English:

It’s often said the kitchen is the room most likely to persuade you to buy a property – or put you off. If you’re thinking of selling, it pays to ensure your kitchen is up to scratch.

Kitchens matter, and even if you’re not selling, an attractive and functional kitchen adds value to your home and makes it easier to live in.

Gutting the room and starting from scratch is a great but only if you have the cash, time and patience, because it is disruptive and expensive.

If you want a quick fix, however, there things you can do without it costing the earth.

The layout of your kitchen is key because it’s such a functional room. If the layout isn’t right, your options for changing it without gutting it are limited, but there are some.

The most ergonomic layout is to have the refrigerator, sink, and the oven and stove in a triangle in relation to each other. It should be a triangle because these are the three things you keep returning to in a kitchen, especially when preparing a meal.

If you don’t have this triangle configuration, can you move something so that you do? Maybe you can swap appliances over, or put an under-counter fridge where you once had a unit.

Do-it-Yourself Rolling Shelf Kit - (Natural)
If lack of worktop space is a problem, think of how you can make what you’ve got go further. For example, microwave brackets get this appliance off the worktop, creating a surprising amount of room.

If your home is on the market, something as simple as removing the dishrack before viewings makes the draining board seem part of the worktop and thus creates the illusion of more space.

Remember people viewing your home will open your cupboards and drawers, so it’s important to keep these tidy and uncluttered.

Cabinet Organizer - 2 Shelf - (White)

Another solution to lack of workspace is to install an island unit – if you’ve got the room.

If you haven’t, maybe a slimline table or breakfast bar will give you more workspace and still allow you to move round the room with ease.

Any kitchen you can bill as a kitchen/diner when selling your home is a bonus because these are much in demand, so even if you can only squeeze in a small breakfast bar or table, do so. Hinged tables which fold flat against the wall when not in use are a good idea if space is tight, and installing one is a relatively simple DIY job.

30/411C Cookware Lid Rack 22x6
If clutter from your cupboards tends to spill out onto the worktop, you have to force yourself to be tidy and stay tidy until your home’s sold. Try putting utensils in drawers or jars/pots and store pastas, cereals and the like in ceramic, glass or chrome airtight jars, preferably stackable ones.

If you’ve got nice glasses, crockery pots and pans, get out your drill and put up some shelves – floating shelves are very fashionable – which gets them out of the cupboards, freeing up space.

Under Sink Pull-Out Organizer
Baskets or boxes can also be stacked on top of wall units if your kitchen has high ceilings and you need to make the most of the space – looking in need of storage is a big no-no when selling your home – though don’t store anything needed too often, or too heavy, up there.

When you’re replacing a kitchen, it’s easy to incorporate manufacturer’s clever design ideas for awkward and small spaces, but if you’re making the best of what you’ve already got, it pays to think laterally, especially when selling your home.

Filed Under: Kitchen, _ Tips

Home Appliance News Survey – 7 September 2006

September 7, 2006 By Appliance

It’s a short week and I’m still not convinced the summer is “officially over”, so blogging is going to be light today with some links to useful resources:

  • A site called Kensington Bungalow is writing a diary about renovating their house. Today’s entry is called DIY Appliance Repair.
  • eCoupons is providing appliance coupons good through September 9 for items from Best Buy.
  • A site I’ve just discovered, Apartment Therapy: Los Angeles, has a nice piece about Sears Appliance Outlets. While the article is focused on Southern California, you can find a Sears Appliance Outlet by entering your zip code, unchecking All Sears Stores and checking Sears Appliance Outlet Stores: Discontinued or slightly blemished appliances at reduced prices near the bottom of the page.
  • Savvy Saver has a piece this week entitled You too can be an appliance repair person!. Even better is their dishwasher – specific article Repair or replace?

That’s it for now.

Filed Under: Dishwasher, Parts/Repairs, _ Tips

Braun Immersion Blender

July 25, 2006 By NightOwl

Braun MR5550MBC-HC Multiquick Professional Hand Blender, MR5550 M BC-HC White Multipurpose

One of the handiest tools in my kitchen is my immersion blender, also known as a hand blender. Immersion blenders have been around for about ten years, and do almost everything that a regular blender does. I have one of the older models made by Braun. Braun makes a number of small household appliances. I also have their coffee maker. (But that’s something for another day.)

For those of you not familiar with an immersion blender, imagine a 12 inch plastic cylinder ergonomically designed to fit comfortably in your hand with a twirling blade at the bottom. To mix, blend or puree, all you have to do is literally immerse the blade in your pot, cup or bowl and push the button. The blade must remain fully immersed or you’ll splatter yourself a bit.

One of the things I like is its ease of cleanup. If you’d like a smoothie, all you have to do is put the ingredients in a large cup, give it a whirl or two, run the blade end under hot water for a few moments and it’s clean. Nothing else to wash but your cup, but of course you’d have that anyway. My Braun hand blender came with a plastic cup as an accessory along with a wall mounting bracket so that it can be conveniently stored in a cupboard. The new models come with a variety of accessories and range in price from around $15.00 to over $400.00 by companies such as Waring, KitchenAid, and Conair.

Something that is important to me, as a matter of both safety and convenience, is the ability to blend right in the pot. If you are making hot soup that needs to be pureed, you have three options.
Wait until it cools and then pour it in small batches into your traditional blender, pour the soup in hot and take the chance of scalding yourself, or, with an immersion blender you can just put the blade into the pot and off you go.

A quick tip: When you are pureeing, be sure to keep the base of the blender at an angle to the base of the pot. If the blender is touching the bottom of the pot, the food won’t circulate, and the machine can’t do its job. I had a friend who had problems using her immersion blender and therefore disliked it. When I explained that you need to keep it angled to allow the food to move through the mechanism she called back to say that it worked perfectly. Depending on the depth of what you are blending you should keep the blade about an inch above the bottom of the pot, and you should move the unit through the liquid as if you were gently stirring it.

The appliance is versatile. Not only do I use it for the basics like milk shakes, smoothies and pureeing soup, it is also wonderful for making homemade refried beans and Hummus. Here’s a recipe you can use to try it out:

Sweet Potato Soup

  • 2 teaspoons butter or margarine
  • ½ cup sliced carrots
  • ½ cup sliced celery
  • 1 ½ cups seeded, peeled and chopped tomatoes
    (or do what I do and use the 28oz can of diced tomatoes)
  • 6 cups broth (chicken, beef, or vegetable – water will do if necessary)
  • 1 ½ pounds sweet potatoes, peeled and sliced thinly
  • pepper to taste
  • Plain yogurt as sour cream as garnish

Jane Brody\'s Good Food Book/Jane Brody\'s Good Food Gourmet/Boxed Set
In a large pot, sauté the carrots and celery in the butter or margarine for about 5 minutes. Do not brown them. Add the tomatoes and cook to reduce the liquid a bit. Add the broth and the sweet potatoes, bring the mixture to a boil, reduce the heat, cover the pot and let it simmer for 20 to 30 minutes or until the vegetables are very soft.

Remove the pan from the heat and puree the mixture directly in the pot. Add pepper and reheat as needed. (This soup can be served cold also, but we prefer it hot) Serve with a dollop of yogurt or sour cream.)

This recipe is from Jane Brody’s Good Food Gourmet.

Filed Under: Cooking, Kitchen, Recipes, Small Appliances, _ Tips

  • « Go to Previous Page
  • Go to page 1
  • Interim pages omitted …
  • Go to page 10
  • Go to page 11
  • Go to page 12

Primary Sidebar

[footer_backtotop]

© 2006-2019 Appliance.net · Log in